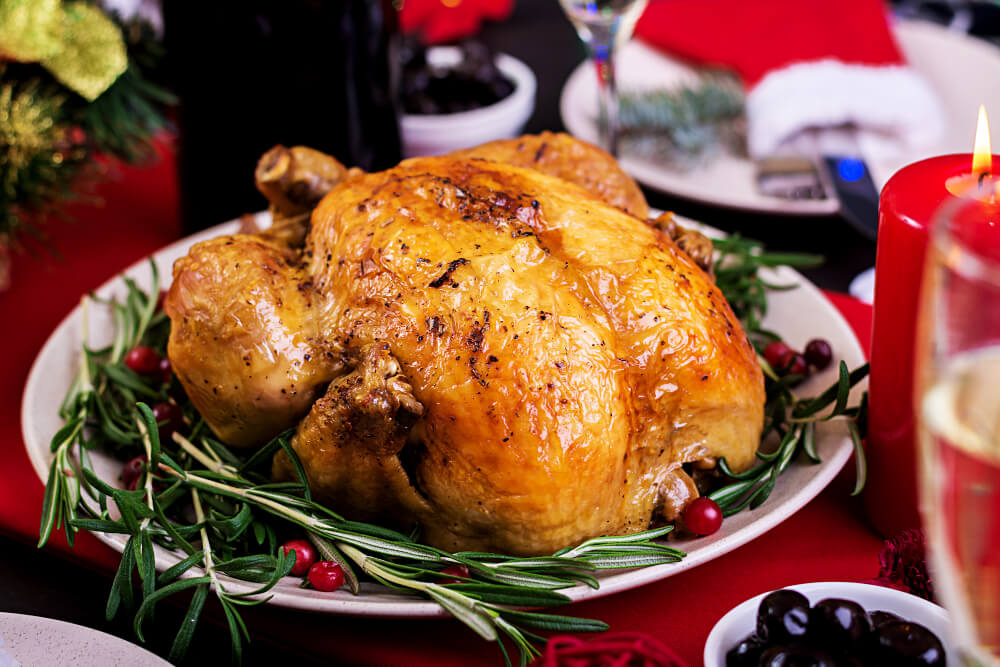
Are you planning to explore new flavors and culinary skills in your kitchen? If so, this whole duck roast recipe is just what you need. A classic, tantalizing, and delicious method of how to cook duck that will impress your friends and family. A whole roast duck is a delightful treat, showcasing crisp skin and tender, juicy meat, and when it's done in your very own oven, it's something truly special.
Armed with a roasting pan and a sense of gastronomic adventure, anyone can master this delightful dish. From sourcing the perfect whole duck to carefully monitoring it while roasting, this recipe ensures an extraordinary experience that transcends the ordinary.
So, are you ready to journey through the steps of this roast duck recipe? Grab your roasting pan, preheat your oven, and let's roast a duck that will make your tastebuds dance with joy! Read on to find out more.
How to Buy Duck for Cooking?
Before anything else, buying a high-quality duck is fundamental to your cooking experience. When you’re planning to roast the duck, the quality, freshness, and preparation of your chosen bird will be pivotal in achieving that perfect crispy duck skin we all crave.
Look for ducks that are well-rounded with a thick layer of duck fat beneath the skin - this is your key to a perfectly succulent and crispy duck. Take the time to inspect the skin for blemishes and tears, as this can influence the overall texture and taste of your roast.
If possible, opt for a fresh, locally sourced duck as opposed to a frozen one. Local butchers, farmers' markets, or specialty food stores often provide higher quality and fresher options. However, if a frozen duck is your only option, ensure it is properly thawed before cooking to retain its flavor and texture.
Consider also the size of the duck. Remember that while cooking, the duck fat will render out and the bird will lose some volume. If you're serving a larger group, you might need a bigger bird, or even two. Generally, a 5 to 6 pound duck would be enough for four people.
If you have a penchant for certain dishes, say, dishes featuring duck legs, it may be more economical to purchase these parts separately rather than buying a whole duck. Some butchers and supermarkets sell duck parts, including duck legs and breasts, separately.
When it comes to preparing for a roasted duck recipe, don’t shy away from asking your butcher to prepare the duck for you. They can remove the giblets, trim excess fat, and even score the skin for you, saving you some time and ensuring your duck is ready for the oven.
Lastly, if you're especially health-conscious, organic, free-range ducks are becoming increasingly available and offer a fantastic flavor profile, often richer due to their varied diet and active lifestyle.

Elevate your dining experience by serving your favorite roast duck on our top-quality walnut cutting board. Say no to ordinary wood or plastic boards that could potentially harm your health. Our cutting boards are Canadian-made, using American Black Walnut, specifically designed for culinary enthusiasts who care about their health and presentation. Impress your guests with these sophisticated boards.
Roasting Duck in Oven Step-by-Step-Guide
Ready to master the art of roasting a duck in the oven? This step-by-step guide will have you wowing guests with a beautiful, crispy-skinned, succulent roast duck.
-
Preparation: First, take your fresh duck and with a sharp knife, score the duck's skin diagonally. Be careful not to cut too deep; you want to cut into the layer of fat beneath the skin without reaching the meat. Prick the skin all over using the point of your knife. This helps render the fat during cooking and results in that coveted crispy skin.
-
Season the Duck: Pat the duck dry using kitchen paper. Now, it's time to season the duck. Rub the duck all over with salt and pepper, making sure to get into the scoring. Don't forget to season the cavity of the duck as well.
-
Preheat Oven: Preheat the oven to 350°F (180°C).
-
Roasting Pan: Place the duck, breast side up, on a rack in a roasting pan. This allows the fat to drain off while the duck cooks.
-
Roasting: Put the duck inside the preheated oven. Roast for 30 minutes.
-
Turn the Duck: After the initial roasting, remove the duck from the oven (be sure to close the oven door to keep the heat in) and turn the duck over, so it is breast side down. This allows the duck breast to baste in its juices, keeping it moist. Return the duck to the oven and continue to roast for another 30 minutes.
-
Flip the Duck: Once again, take the duck from the oven and flip the duck, returning it to its breast side up position.
-
Final Roasting: Now, we're on the home stretch. Continue to roast the duck for another 30-40 minutes, or until the skin is golden and crispy.
-
Resting: After your duck has reached its gorgeous, golden-brown finish, remove the duck from the oven. It's important to let it rest for at least 15 minutes before carving. This allows the juices to redistribute throughout the duck, ensuring moist and tender meat.
-
Reheat: If you find the duck has cooled too much during the resting period, you can reheat it in a hot oven for about 10 minutes to re-crisp the skin and warm the meat before serving.
Useful Tips When Roasting Duck in Oven
Roasting a duck in the oven can be a rewarding endeavor, providing you with a flavorful centerpiece for any occasion. Here are some useful tips to ensure you get the best results:
-
Score the Duck: Be meticulous when scoring the duck's skin. This not only aids in rendering the fat, which leads to a crispier skin, but also allows your seasoning to penetrate deeper into the duck meat.
-
Mind the Cavity: It's important to clean and season the duck cavity properly. You can also stuff it with aromatic herbs or citrus fruits, which infuses the meat with additional flavor from inside the duck.
-
Monitor Cooking Time: Don't solely rely on cooking times. Every oven is unique and may run slightly hotter or cooler than others. Roast 30 minutes initially, then flip and check the duck regularly to avoid overcooking.
-
Flipping is Crucial: Don't forget to flip the duck breast side up after half the cooking time. This ensures even browning and crispness all over the bird.
-
Rest Before Carving: Allowing the duck to rest after roasting is just as important as the cooking process itself. It lets the juices settle back into the meat, making your duck juicier and more flavorful.
-
Set the Duck: When starting to roast, set the duck breast side up on the roasting rack. This will initially heat the denser breast meat, which takes longer to cook than the legs and wings.
How to Properly Store Leftover Duck Meat

Properly storing duck is essential for maintaining its quality and flavor. After you've enjoyed your easy roast duck recipe, ensure any leftovers are cooled before storing. Remove the remaining meat from the bone, cover it tightly in foil or place it in an airtight container.
Store the duck in the refrigerator within two hours of cooking to avoid bacterial growth. Remember, the duck breast-side pieces should be kept separately to retain their crispness.
To enjoy it later, take the duck out of the refrigerator, allow it to come to room temperature and then heat it in a preheated oven. Place the duck on a rack to keep the skin from becoming soggy. This reheating process will maintain that crispy skin and moist meat we all enjoy so much.
Conclusion
As we wrap up, remember that a well-prepared duck is not just about the cooking process, but also about how it's served and stored. With these tips and techniques, you're now equipped to roast, serve, and store a duck like a culinary pro.
Related Articles
- How To Roast Whole Pig | Cooking Suckling Pig Recipe
- How Much Does a Whole Pig Cost? Whole Hog Buying Guide
Related Products You Might Like
A great roast duck deserves to be carved on a quality surface. Wooden cutting boards are a great choice, offering both durability and aesthetic appeal.
Here at Mevell, we offer top-notch wood cutting boards designed to withstand sharp knives and heavy use. It's the perfect accessory to complement your roasting endeavors and elevate your kitchen setup.